My oldest has really been into crystals for a few years now. Every time we go for a walk, or join our Cub Scout pack for a hike, he spends a lot of the time searching for crystals along the way. He once made crystals during an event at church, and wanted to make some at home to. I’ve been thinking of making some crystals with the boys for fun, but couldn’t decide which ones to make. So we decided to perform our own crystal science experiment at home, to find out how three different kinds of crystals compare to one another.
A Science Experiment at Home to Compare Crystals
The three types of make at home crystal recipes most common are: salt, sugar, and borax. When making crystals from either of the substances, you first create a water and salt, sugar, or borax solution. A solution is a mixture of two or more substances, where you can not see the separate substances without a separation procedure, such as boiling. There are two parts to a solution: a solute and a solvent. The solute is the substance that dissolves, and the solvent is the majority of the mixture. In the case of making crystals, the solvent is water, and the solute is either salt, sugar, or borax.
I found various ratios of water to salt, sugar, and borax, while looking for recipes of each crystal. I decided to conduct our experiment using the same ratio of solvent (water) to solute (salt, sugar, or borax).
Crystal Experiment
Post contains affiliate links. Please see disclosure for more details.
Supplies
3 chalkboard garden sticks
1 piece of chalk
3 white pipe cleaners
salt
sugar
borax
water
3 small glass mason jars
Salt Crystal Science Experiment
Step 1: Wrap the end of a pipe cleaner around a garden stick. Label the garden stick “Salt” with chalk.
Step 2: Boil 1/2 cup of water.
Step 3: Slowly pour in 1/4 cup of salt, and stir until all the salt is dissolved. You should see small crystals forming on the surface of the water.
Step 4: Transfer the salt water into one of the mason jars.
Step 5: Stick the pipe cleaner into the water/salt solution.
Step 6: Place the jar in a well sunlit location. I placed mine on a window sill.
Sugar Crystal Science Experiment
Step 1: Wrap the end of a pipe cleaner around a garden stick. Label the garden stick “Sugar” with chalk.
Step 2: Boil 1/2 cup of water.
Step 3: Slowly pour in 3/4 cup of sugar, and stir until all the sugar is dissolved. You should see small crystals forming on the surface of the water.
Step 4: Transfer the sugar water into one of the mason jars.
Step 5: Stick the pipe cleaner from step 1 into the water/salt solution.
Step 6: Place the jar in a well sunlit location. I placed mine next to the salt water, on a window sill.
Borax Crystal Science Experiment
Step 1: Wrap the end of a pipe cleaner around a garden stick. Label the garden stick “Borax” with chalk.
Step 2: Boil 1/2 cup of water.
Step 3: Slowly pour in 1/4 cup of borax, and stir until all the borax is dissolved. You should see small crystals forming on the surface of the water.
Step 4: Transfer the borax water into one of the mason jars.
Step 5: Stick the pipe cleaner into the water/borax solution.
Step 6: Place the jar in a well sunlit location. I placed mine on a window sill, next to the salt and sugar solutions.
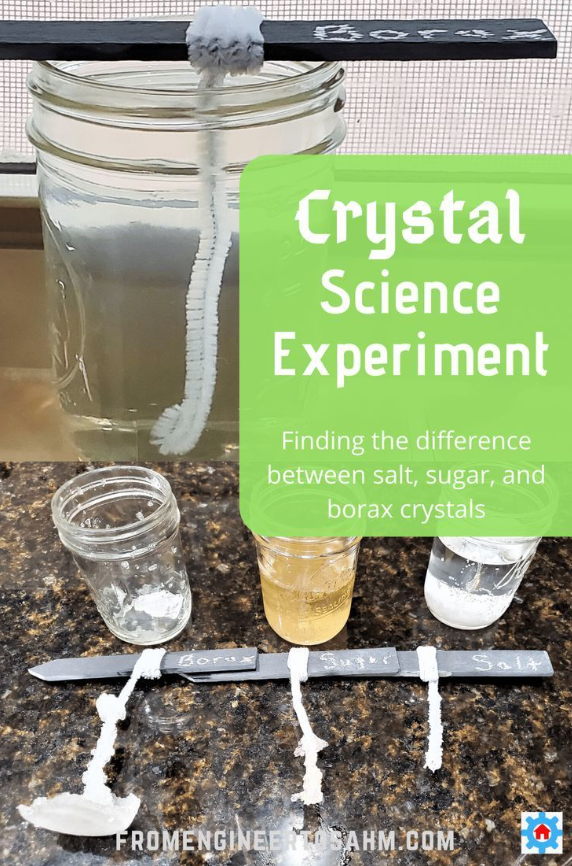
I let all the solutions sit on the window sill over night, and the next afternoon we pulled out our crystals and this is what we found!
The salt and sugar crystals were less than impressive, but the borax crystals formed really nicely!
I did a little more research on salt and sugar crystals, and found out they needed more time to form. I left the pipe cleaners in the salt and sugar solutions for another week, and these were our results!
Crystal Science Experiment Thoughts
All three solutions created very different crystals. The salt crystals look more like fluffy snowballs, which formed after a week of the pipe cleaner in the solution. The pipe cleaner wire also started to rust, which may have hindered the crystals from forming.
The sugar crystals were small and spiky (as described by my 4 year old). The pipe cleaner’s wire did not rust in the sugar water solution, which is an interesting result!
The borax crystals were more like the crystals we expected to make before we started our experiment, cube shaped and clear.
My oldest one and I spent some time talking about our results. We discussed why the crystals all had different shapes to them. I told him the reason was because the molecules in each solution form a particular pattern when going from liquid to solid state(solution to crystal) In other words, the molecules of the salt water solution (sodium, hydrogen, and oxygen) form a certain pattern of bonds when cooling down. The pattern of bonds results in a particular shape of the crystal. The same holds true for the sugar and borax solutions.
Have you tried a crystal science experiment at home? What were your results? We really loved experimenting with making crystals, so expect to find more on the blog soon!